Articles
![]() Articles Home
Articles Home
Fingerboard Insights for all Guitarists
No Pain, No Gain
It's About TIme
All work IS all play for Howard Morgen by John Huntley, Just Jazz Guitar Magazine, (pdf)
Fingerboard Insights for all Guitarists
by Howard Morgen
(This column is the first installment of a continuing series that appeared in Fingerstyle Guitar magazine.)
|
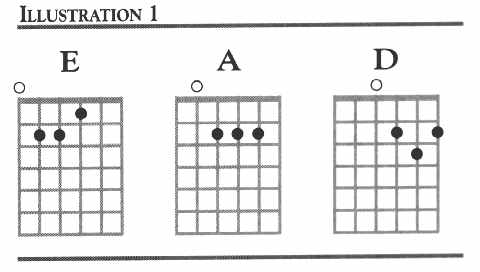
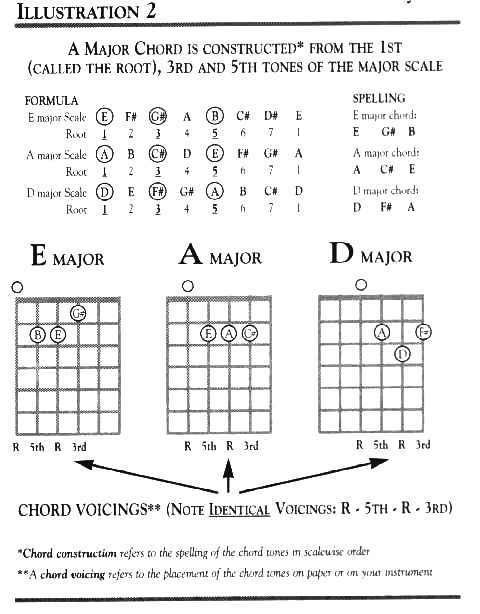
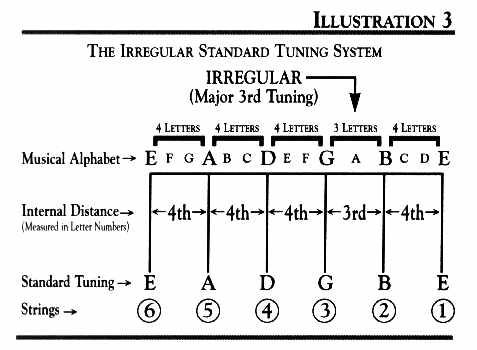
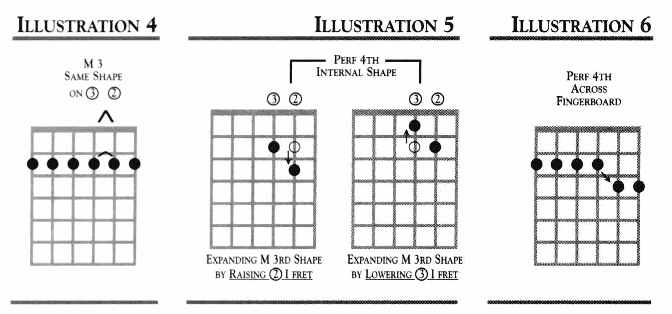
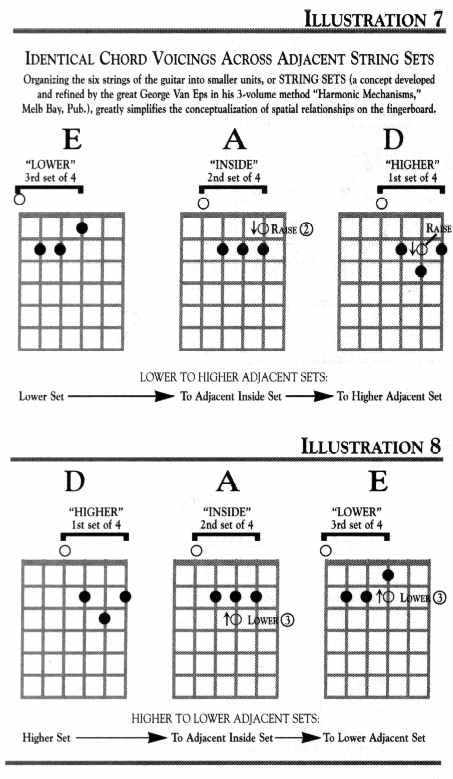
Not long after sitting down with the guitar, trying to come up with some new ideas, the fingerboard begins to dissolve into an elusive maze of strings and frets. Sound familiar? No wonder! There are a host of built-in obstacles, which often combine to make the visualization of musical relationships on the guitar fingerboard a difficult and frustrating task for most players, regardless of style or level of technical proficiency. The focus of this column, as it unfolds over the coming months, will be to supply insights and concepts that will help overcome impediments to clear thinking on the fingerboard. Wherever possible, the spin of each article in the series will be to illustrate a wide range of information, giving examples that apply to beginning, intermediate, and advanced players. In short, this column is meant for all guitarists. I'm going to start close to ground zero, develop very gradually, and take little for granted. Intermediate and advanced players are advised not to skip any of the preparatory material, no matter how basic or obvious it may seem at first glance. Many obstacles to understanding the guitar are the product of misconceptions that almost inevitably occur at the earliest stages of musical development. For example, most beginning pianists, who generally learn to read music early on, are able to see from the notation that each of the tones that make up a chord (called voices) tend to evolve and flow in a linear, horizontal manner to the tones of the chords that follow. This insight of the close interdependence among chords in a chord progression is essential for the later development of improvisational, arranging, and compositional skills. Now, think back to when you first learned to play guitar. (For some, thats not so long ago; for others it may be a major leap!) You probably learned your first chords from a friend or a chord book. There was no time to analyze the tones that made up the chord forms or to speculate on why they were shaped in a certain way. It was enough just to press down the strings with sufficient force to keep them from buzzing! Once the calluses came, the next task was to develop the coordination to get to the next chord, and make the change without stopping. Musical progress tended to be measured more in terms of either the number of chord grips memorized or how difficult the grips were to finger, rather than on how skillfully and musically the chords could be made to relate to each other. And so, out of early necessity, habits were formed of memorizing shapes without analyzing their relationships to each other, thus fostering a fundamental misunderstanding of the nature of harmonic progression. (Ill return to this concept in future articles, where well examine chord progression, chord symbol interpretation, and voice-leading techniques in detail.) In this visit, lets look at a major impediment to harmonic understanding that all guitarists encounter from the moment we first pick up a guitar. That obstacle (which is also a two edged sword since it has advantages as well as disadvantages) is the guitars irregular, unequal Standard tuning system. It has evolved independently of other instruments and their notational systems, and is based largely on pattern recognition, tablature, and fingering considerations. Unlike the piano, with its musically accessible and repetitive pattern of symmetrically spaced black and white keys that graphically depict the musical alphabet, the guitar fingerboard is elusive and difficult to visualize, frequently obscuring musical relationships! For example, the three major chord shapes in Illustration 1 are identical in construction and voicing. Its highly unlikely that any beginner would realize this fact by looking at them. Illustration 2 shows that these three chord shapes are indeed identical in construction and voicing. Come to think of it, how is it that these identically voiced chords appear as three different shapes? For the answer, we need to examine the standard tuning system. In Illustration 3, all the intervals between adjacent strings 6 & 5, 5 & 4, 4 & 3, 2 & l are an equal distance of four letter names apart (perfect 4ths). The irregular interval occurs between adjacent strings 3 & 2, and is three letter names apart (major 3rd). In Illustration 4, notice that the shape of the major 3rd interval between 3 & 2 (two notes located on adjacent strings on the same fret) is exactly the same as the shape of the perfect 4th interval on all of the other adjacent strings. In order to produce a perfect 4th on 3 & 2, you need to expand the major 3rd shape 1/2 step (one fret) in either direction along the fingerboard. This is accomplished by either raising the pitch of the second string one fret or by lowering the pitch of the third string one fret (Illustration 5). Accordingly, a series of perfect 4ths across all six strings would produce the shape in Illustration 6. |
|
|
|
|
Recognition of the half step (one fret) expansion that must occur between 3 & 2 to equalize the interval relationships between all of the adjacent strings is the key factor in understanding how and why all chord shapes, as well as scale patterns, appear as they do across the entire fingerboard. For example, lets now return to our original three identically voiced major chord shapes in Illustration 7. This time, however, each shape is shown along with the string set it occupies. The E chord voicing occupies the 3rd set of four adjacent strings that is comprised of perfect 4th intervals. If the 2nd and 1st sets of four adjacent strings were also tuned in perfect 4ths, then transferring the E chord voicing (R-5-R-3) to the adjacent 2nd and 1st sets would not change its shape! However, both the 2nd and 1st sets include the major 3rd between strings 3 & 2 (Illustration 8). Here are two formulas you can use when transferring any chord voicing across adjacent string sets that include the 3rd and 2nd strings:
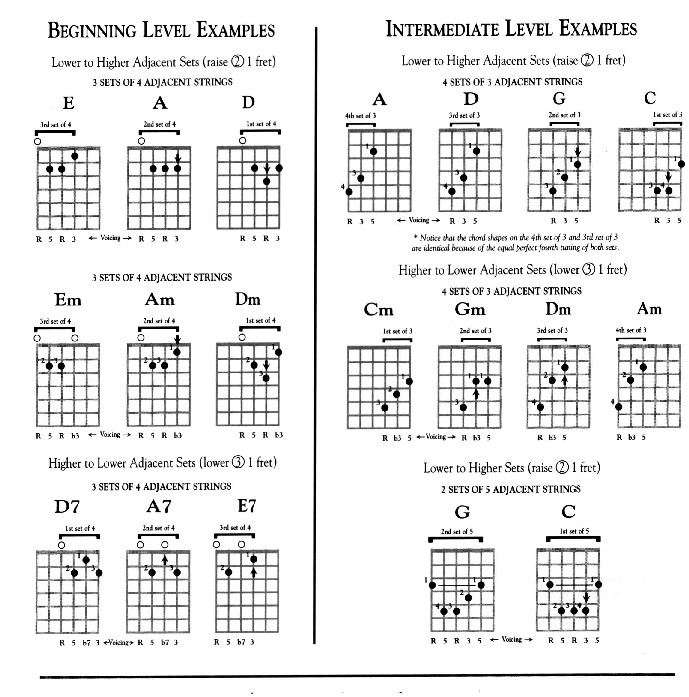
The examples below, designed for beginner, intermediate and more advanced playing levels, are practical applications of transferring identical chord voicings across adjacent string sets. The examples are not restricted only to three sets of four adjacent strings; they also include four sets of three adjacent strings, two sets of five adjacent strings, and two broken sets of five strings. I suggest that in transferring any voicing across the string sets, you retain the shape and fingering of the original voicing until your fingers touch down on the new set. Then, and only then, readjust your fingers according to the desired new shape. |
|
|
|